- Choose and install Eclipse version of your choice. In my case it is Eclipse Indigo Sr2 for Java EE developers.
- Download and install JBoss Tools 3.3.
- Download and define JBoss server instance in Eclipse IDE for JBoss AS 7.1.1.
- Create new project Dynamic Web Project. Since I want to place my web project in EAR file, I will define EAR project first.
- Download and add primefaces-3.5.jar to your project lib directory.
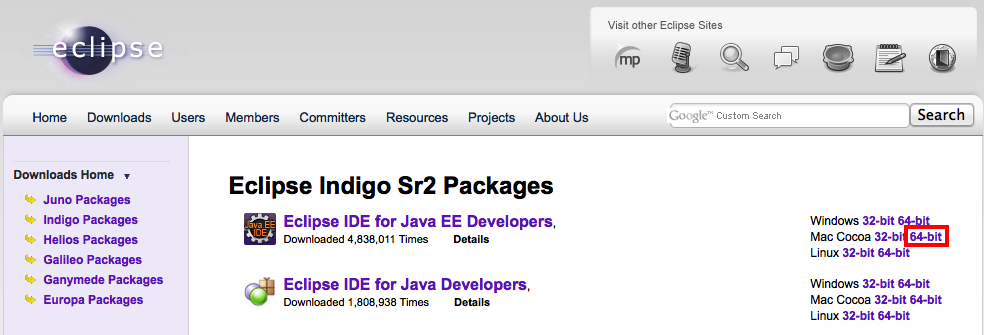
You can find Eclipse Indigo here: Eclipse Indigo Download Page. Select your Eclipse version. In my case, it's Eclipse IDE for Java EE Developers. Since I'm developing on Mac, I will select a 64-bit Mac Cocoa installation:
After download and installation are completed, you can start your Eclipse and install required Eclipse plugins.
JBoss Tools installation
Now you can install JBoss Tools plugin in your Eclipse. To do this go to Help -> Install New Software:

Then define a new repository site:

Now you can define a new repository. Put JBoss Tools 3.3 as name and http://download.jboss.org/jbosstools/updates/stable/indigo/ as repository location and click OK:

After that you can click Select All and Next to go to the next installation step:

Click Next once again, accept license terms and click Finish to start installation. During installation Eclipse will ask you whether you want to install unsigned content, click OK:

When Eclipse finishes plugin installation, it will ask you what to do next, click: Restart Now:

After this last step, your IDE is ready to define a new server instance and create a new Dynamic Web Project.
JBoss AS 7.1.1 Installation
In order to install JBoss AS, go to JBoss Application Server Downloads page and get JBoss 7.1.1.Final Brontes. After download unzip it, go to Servers view in your Eclipse and click new server wizard to define new server:
On the list of server adapters select JBoss Community -> JBoss AS 7.1. Put localhost as server host name and click Next:

On the next wizard page set server folder and click Next:

Click Finish to end the adapter definition step. Your server adapter is ready. Now you can go to the next step, which is project creation.
Dynamic Web Project Creation
As I mentioned earlier, I want my project to be deployed as EAR file, so first I'm going to create an EAR project. To do so, I'm going to File -> New -> Enterprise Application Project in my Eclipse. I will set the name of this project to CRUDPrimefaces_EAR and click Next. On the next wizard page I will select checkbox Generate application.xml deployment descriptor and click Finish:


In this stage you will get the following error:
Description Resource Path Location Type
cvc-complex-type.2.4.b: The content of element 'application' is not complete. One of '{"http://java.sun.com/xml/ns/javaee":display-name, "http://java.sun.com/xml/ns/javaee":icon, "http://java.sun.com/xml/ns/javaee":initialize-in-order, "http://java.sun.com/xml/ns/javaee":module}' is expected. application.xml /CRUDPrimefaces_EAR/EarContent/META-INF line 2 XML Problem
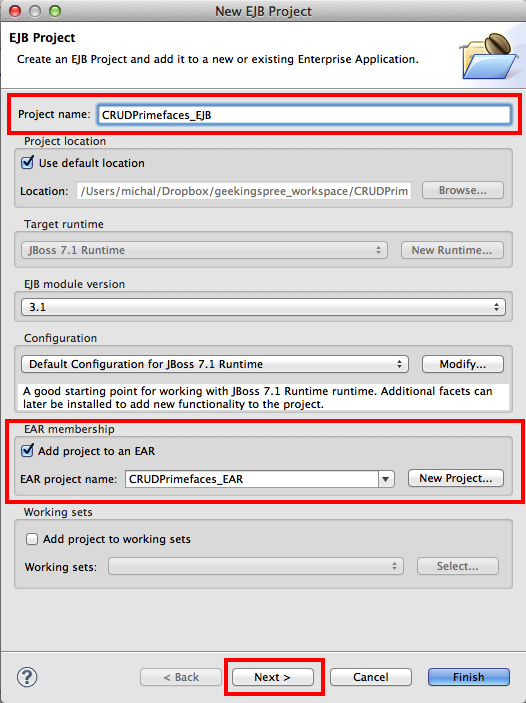
in your application.xml file. This happens, because there is no EJB Project associated to your EAR project (or in other words: EAR file should store at least one EJB module). Let's define it now and then we can finally create a Dynamic Web Application. To do this, go to File -> New -> EJB Project in your Eclipse. Set project name to CRUDPrimefaces_EJB, select Add project to an EAR checkbox and click Next:
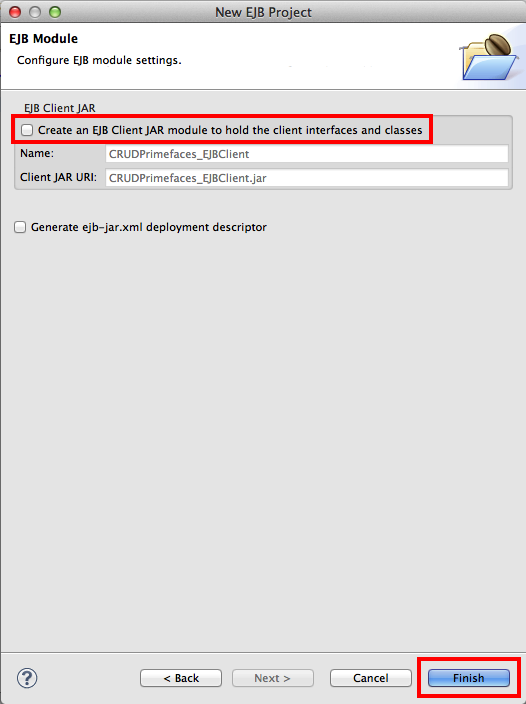
Click again Next and on the last wizard page, uncheck Create an EJB Client JAR module to hold the client interfaces and classes:
Click Finish to create an EJB Project. After the project creation application.xml is completed, the error should disappear. Finally, we can create a new Dynamic Web Project. Click File -> New -> Dynamic Web Project, set CRUDPrimefaces as project name and check Add project to an EAR. Click Next:

On the next wizard page click Next. On the next web page check Generate web.xml deployment descriptor and click Finish:

Done. After this step your application.xml file should have the following structure:
and your project explorer should, more or less, look like this:

PrimeFaces installation
Go to PrimeFaces download page and download primefaces-3.5.jar:

After download drag and drop primefaces-3.5.jar to dynamic web project directory CRUDPrimefaces/WebContent/WEB-INF/lib. Create faces directory in your CRUDPrimefaces/WebContent. Now your project structure should look like this:

You are ready to start developing JSF PrimeFaces application. In the next article I will explain how to adjust web.xml file for JSF mapping and how to create a simple Hello Faces world JSF page.
Read timed out troubleshooting
During installation of JBoss Tools 3.3 plugins set, you can get the following error (or a similar error):
An error occurred while collecting items to be installed
session context was:(profile=epp.package.jee, phase=org.eclipse.equinox.internal.p2.engine.phases.Collect, operand=, action=).
Unable to read repository at http://download.jboss.org/jbosstools/updates/JBossTools-3.3.2.Final.core/plugins/org.jboss.tools.seam.xml_3.3.0.v20130112-0336-H148-Final.jar.
Read timed out
Read timed out can be caused by various things. What's important here is the knowledge of how to solve this issue. In order to install a set of plugins successfully, you need to modify your eclipse.ini settings to increase timeouts. Edit your eclipse.ini and add the following settings as -vmargs:
-Dorg.eclipse.ecf.provider.filetransfer.retrieve.closeTimeout=30000
-Dorg.eclipse.ecf.provider.filetransfer.retrieve.readTimeout=30000
Restart your Eclipse to apply new settings and start plugins installation again. This workaround should solve the read timed out problem.
Additional information
This article is a part of the series of articles called From Zero to PrimeFaces Hero on JBoss 7.1 with Hibernate, MySQL, Eclipse Indigo and JBoss Tools. If you'd like to get more information about this series, please check out this article.
Awesome post, very useful
Celso Rubén Ortiz A.
May 9, 2013 at 7:22 AMThank you!
Unknown
May 9, 2013 at 11:40 AMwith the help of JBoss Tools, we can actually setup JSF project with all the JSF project structure ready,
instead of just drag the PF jar into a Dynamic Web Project.
If interested, please refer http://www.kianworknotes.com/2013/04/how-to-create-primefaces-project-with.html for steps.
kian
June 3, 2013 at 9:38 PMHey Kian, thanks for comment. It's always good to know better solution!
Unknown
June 5, 2013 at 12:47 PMI've just realized that SyntaxHighlighter (I belive by Alex Gorbatchev) is not working on iOS (Safari). At least for mobile version of this site (this is blogger.com blog).
You won't see any source code on this page (like XML, java or other samples).
Sorry for technical problems. I will stop using this tool.
Best Regards,
Michael Flowersky
Unknown
August 1, 2013 at 11:35 PM