Important note
In all articles of the series From Zero to PrimeFaces Hero on JBoss 7.1 with Hibernate, MySQL, Eclipse Indigo and JBoss Tools I'm refering to JSF 2.0 specification and Facelets technology by writing JSF. It's faster.
web.xml configuration
Let's start with adjusting web.xml file to map JSF servlets. In my previous tutorial I created faces directory inside CRUDPrimefaces/WebContent. In this directory I will store my JSF pages. To tell the application server that we want to handle JSF, we need to put the following content to CRUDPrimefaces/WebContent/WEB-INF/web.xml:
I will start explaining everything from this part of web.xml:
welcome-file node informs application server which JSF page should be used when user goes to http://host/CRUDPrimefaces/ (default URL for our webapp). Default JBoss 7.1 AS deployment URL on localhost is always http://localhost:8080/CRUDPrimefaces/. So when the user goes to http://localhost:8080/CRUDPrimefaces/ ,JBoss triggers index.xhtml JSF page.
Now you could ask How JBoss knows that index.xhtml is JSF page ? or in other words How JBoss knows that index.xhtml should be handled by JSF servlet ? This is defined in servlet-mapping node. Please notice that in this node we are explaining to JBoss that each URL which matches *.xhtml pattern should be handled by Faces Servlet:
So what is Faces Servlet ?, you could ask. Faces Servlet is defined also in web.xml file. Let's check servlet node (servlets definition node):
In the code excerpt above, we explained to JBoss what is Faces Servlet. Faces Servlet name refers to javax.faces.webapp.FacesServlet. So all URLs, which follow the pattern that matches *.xhtml are handled by
javax.faces.webapp.FacesServlet. A part of definition of FacesServlet from Java EE 6 documentation (http://docs.oracle.com/javaee/6/api/javax/faces/webapp/FacesServlet.html):
FacesServlet is a servlet that manages the request processing lifecycle for web applications that are utilizing JavaServer Faces to construct the user interface.
The last thing, which should be explained in servlet node is load-on-startup node. Basically, if value of this node is greater than 0 or equal to 0, it indicates that the application server should load this servlet on web application deployment or on the start of application server. Here is a complete description of this property (from file http://java.sun.com/xml/ns/javaee/web-common_3_0.xsd):
The load-on-startup element indicates that this servlet should be loaded (instantiated and have its init() called) on the startup of the web application. The optional contents of these element must be an integer indicating the order in which the servlet should be loaded. If the value is a negative integer, or the element is not present, the container is free to load the servlet whenever it chooses. If the value is a positive integer or 0, the container must load and initialize the servlet as the application is deployed. The container must guarantee that servlets marked with lower integers are loaded before servlets marked with higher integers. The container may choose the order of loading of servlets with the same load-on-start-up value.
Now when we know how to configure our webapp to serve JSF pages, we can create one.
Creating JSF page
Let's start with creating index.xhtml page in CRUDPrimefaces/WebContent/faces directory. Right-click on faces directory in your Project explorer, select New -> XHTML Page:

Edit index.xhtml file to put the following code in it:
The code excerpt above renders Hello, PrimeFaces World! header and one form. There is one text field with label Firstname in this form. The form's action is triggered when the button Say Hello ! is clicked. When user fills in Firstname text field with his name and clicks Say Hello ! button helloBean.name is set with the field's and Hello dialog shows up. In Hello dialog text Hello, plus name property value are displayed. So if I put, for example, Michael into the text field, I will get Hello, Michael. Let's create helloBean now.
Creating ManageBean
ManageBean is a normal Java class with one additional annotation @ManagedBean. I will put my ManageBean in a package com.geekingspree.beans. To do so, I will create this package in CRUDPrimefaces/src directory. Right click on CRUDPrimefaces/src, select New -> Package:

Set package name to com.geekingspree.beans and click Finish:

When the package is created, we can go to create ManageBean class. Right-click on a newly created package and select New -> Class:
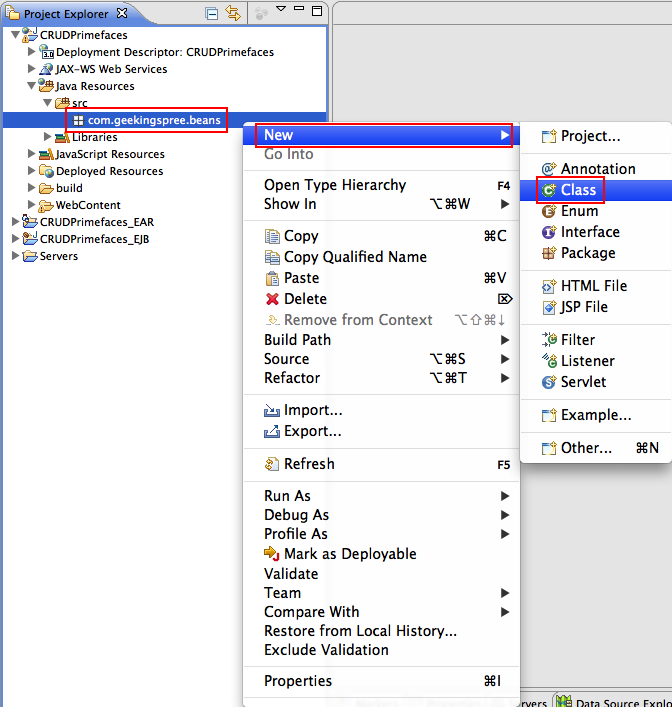
Put HelloBean as a class name and click Finish:

Open HelloBean.java and put the following code in it:
Please notice that for each private property we need to provide get and set method in our ManageBean. Remember that we can set ManageBean name as attribute (in this case, helloBean). So when we want to refer to HelloBean in JSF context we write helloBean.
Application deployment
Our simple application is ready to be deployed on JBoss 7.1 Application Server. Go to Servers tab in Eclipse and right-click on JBoss 7.1 Runtime Server and select Add and Remove ...:

In Add and Remove ... window click on CRUDPrimefaces_EAR, then click Add >, so that CRUDPrimefaces_EAR moves from Available to Configured list. Click Finish:

Now our EAR project is marked as deployable on JBoss 7.1 Application Server. Let's start our server and see the demo.
Starting JBoss 7.1 Application Server
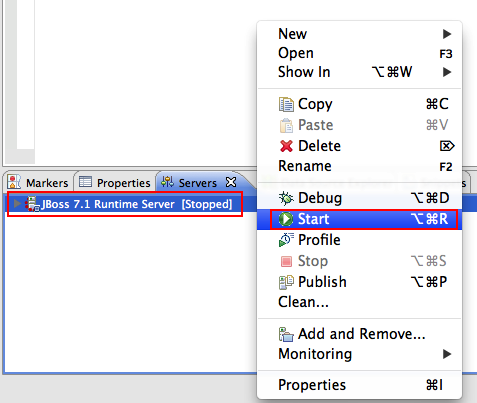
Right-click on JBoss 7.1 Runtime Server and select Start:
After you click Start you need to wait some time for JBoss to bootstrap and deploy EAR project. If everything goes OK, you will see the following log entry in your console:
[org.jboss.as.server] (DeploymentScanner-threads - 2) JBAS018559: Deployed "CRUDPrimefaces_EAR.ear"
Now you can go to http://localhost:8080/CRUDPrimefaces in your browser to see the demo.
The Demo
Welcome page:

I will put my name in the text field:

And now, when I click Say Hello ! button, I will get the following dialog:

Additional information
This article is a part of the series of articles called From Zero to PrimeFaces Hero on JBoss 7.1 with Hibernate, MySQL, Eclipse Indigo and JBoss Tools. If you’d like to get more information about this series, please check out this article. The previous article from this series is Prepare your JSF PrimeFaces project for Eclipse Indigo and JBoss AS 7.1.1.
I've just realized that SyntaxHighlighter (I belive by Alex Gorbatchev) is not working on iOS (Safari). At least for mobile version of this site (this is blogger.com blog).
You won't see any source code on this page (like XML, java or other samples).
Sorry for technical problems. I will stop using this tool.
Best Regards,
Michael Flowersky
Unknown
August 1, 2013 at 11:35 PMI am using eclipse kepler and primeface 5.0.
I follow by this article and get the error "Uncaught ReferenceError: dialog is not defined" when I click Say Hello button.
After changing to oncomplete="PF('dialog').show()" it's worked well.
Unknown
May 25, 2014 at 11:13 AM