- Configure your environment and create TODO_EAR (EAR project), TODO_EJB (EJB project) and TODO (Dynamic Web Project) in a way I've described in this post.
- Prepare your web.xml file and add JBoss 7.1 Adapter to your Eclipse Indigo in a way I've described in this post.
- Install MySQL Server 5.5.
- Create MySQL Server 5.5 database for our TODO application.
- Download and setup Connector/J (JDBC MySQL Driver)
- Add JPA 2.0 capabilities to your Dynamic Web Project, so that you are able to synchronize entities classes with tables in MySQL database server from Eclipse Indigo.
- Configure persistence settings (persistence.xml).
- Implement Hibernate entities.
- Synchronize Hibernate entities with database tables.
- Setup MySQL Driver as JBoss 7.1 AS module.
- Define Datasource.
- Deploy EAR on JBoss 7.1 AS. I've already explained how to deploy EAR unit in this context here.
In the next part of this series I will show you how to build PrimeFaces CRUD interface, so that you will be able to test your entities.
Installation of MySQL Server 5.5
Installation instruction depends on the operating system on which you want to install MySQL. I'm going to describe how to install MySQL on Ubuntu Linux, OSX Lion and Microsoft Windows XP and newer versions.
Installation of MySQL Server 5.5 on Ubuntu Linux
This one is really easy - just go to the Terminal and put:
During installation you will be asked to set a password or leave it blank (by default MySQL password is blank). I will set mine to 123 (usually I'm not using such complicated passwords), just for the purpose of this example:

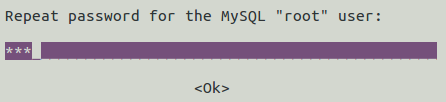
After pressing enter, you will be asked to retype your password, so do it and press enter:
When MySQL package installation is finished, you will be able to create your database.
Installation of MySQL Server 5.5 on Windows
This one is also really easy:
- Go to MySQL download page and download MySQL 5.5 Server Installation Wizard for Windows Platform,
- Install as normal Windows program using installation wizard.
By default, username is root and password is blank, so change it to 123.
Installation of MySQL Server 5.5 on OSX Lion
As easy as downloading MySQL Server from this page and running the installer. By default, username is root and password is blank, change it to 123.
Creating MySQL Server 5.5 database
Now, let's create a database for our TODO webapp. On Ubuntu I will just type:
in my terminal, where root is a default username, 123 is my password and todoapp is my database name. Now you can type:
to open MySQL Monitor and then:
to see that your database was created. The result should be like this:
mysql> show databases;
+--------------------+
| Database |
+--------------------+
| information_schema |
| mysql |
| performance_schema |
| test |
| todoapp |
+--------------------+
5 rows in set (0.00 sec)
Ok, now your database is created. We can start configuring our Eclipse Dynamic Web Project for JPA 2.0 capabilities.
Downloading Connector/J (JDBC MySQL Driver)
Go to Connector/J download page and download TAR or ZIP archive and extract it to a prefered location. Our next step will be to setup JPA 2.0 capabilities in Dynamic Web Project, where we need this connector. I'm using mysql-connector-java-5.1.23-bin.jar.
JPA 2.0 capabilities in Dynamic Web Project
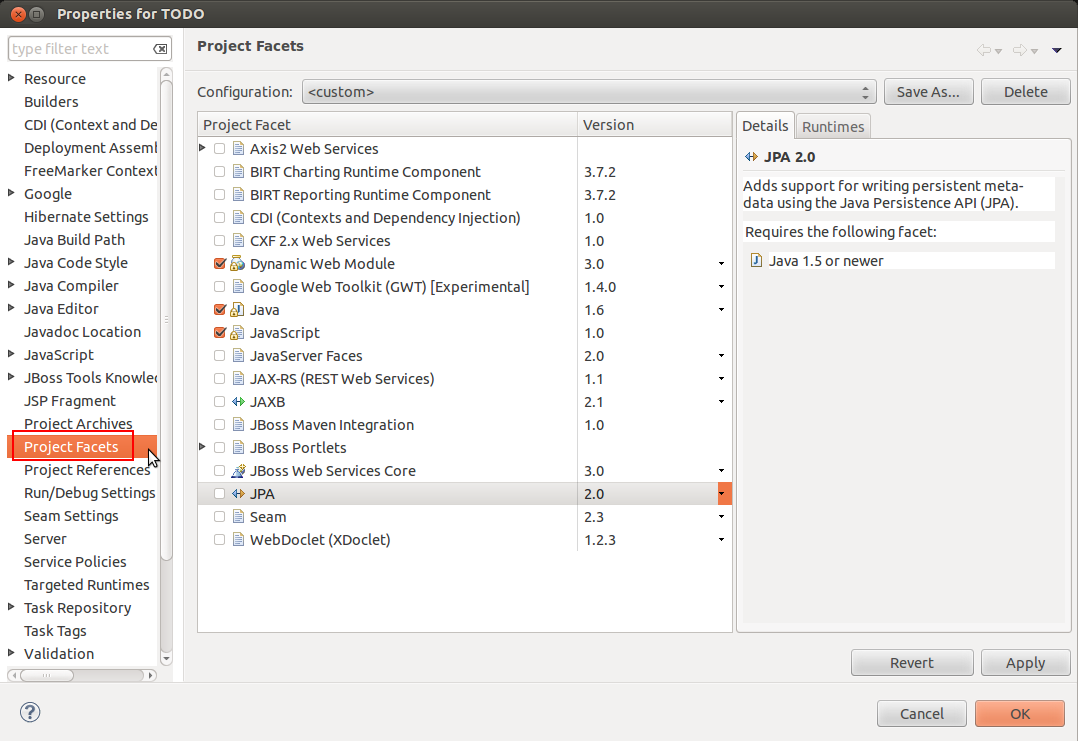
Default Dynamic Web Project does not allow you to use JPA Tools on it. In order to change this feature, you need to right-click on TODO Dynamic Web Project and go to Properties -> Project Facets:
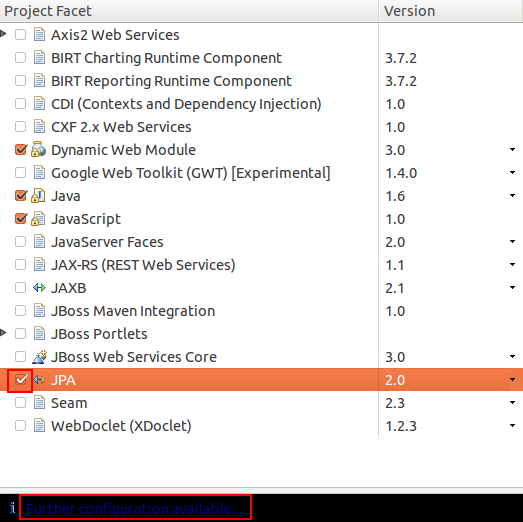
Once you've done it, click on JPA checkbox and then on Further configuration available ... link:
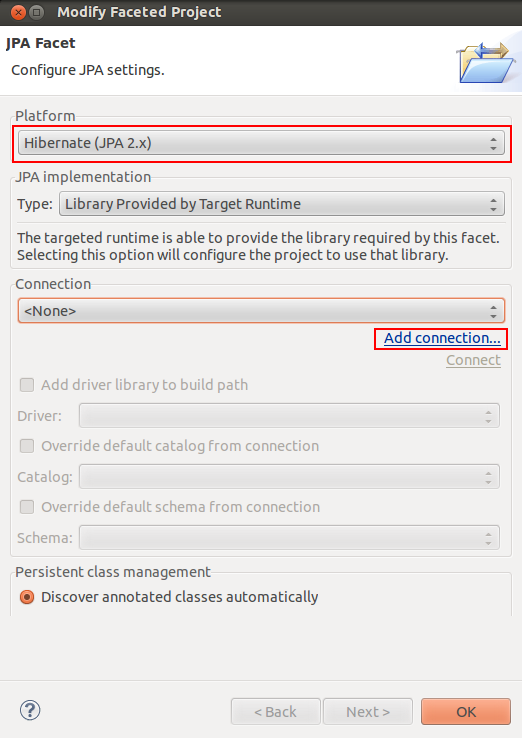
On JPA Facet dialog set Hibernate (JPA 2.x) as Platform and click on Add connection ... link:
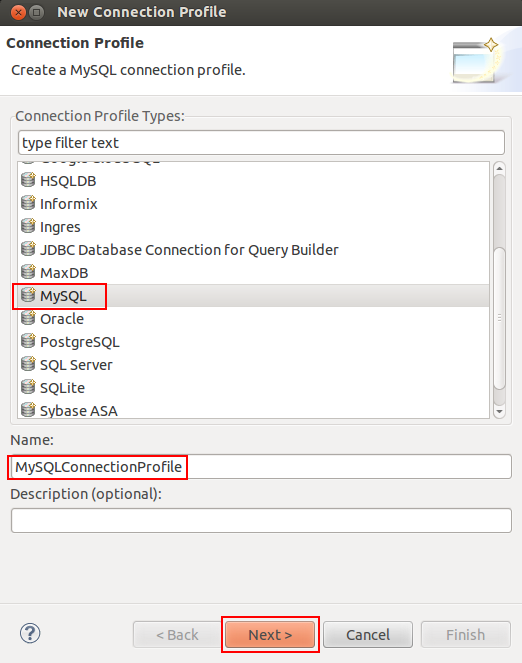
Select MySQL in Connection Profile Types window, set connection profile name to: MySQLConnectionProfile and click Next to go to the next wizard page:
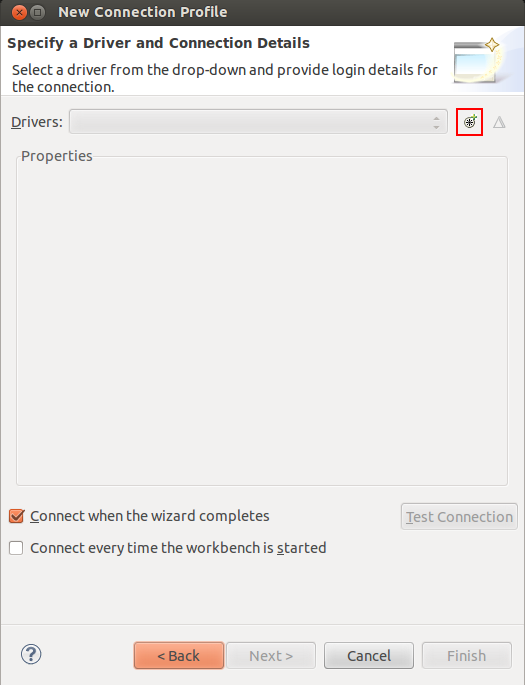
On Connection profile page click on New driver definition:
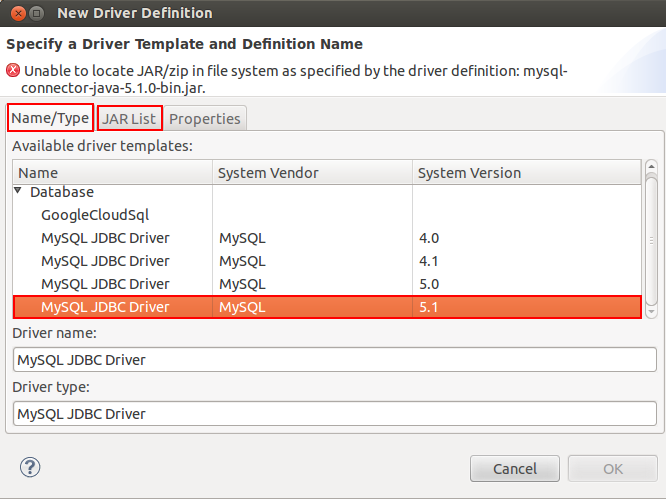
On New Driver Definition page (Name/Type tab) select MySQL version 5.1 and go to JAR list tab:
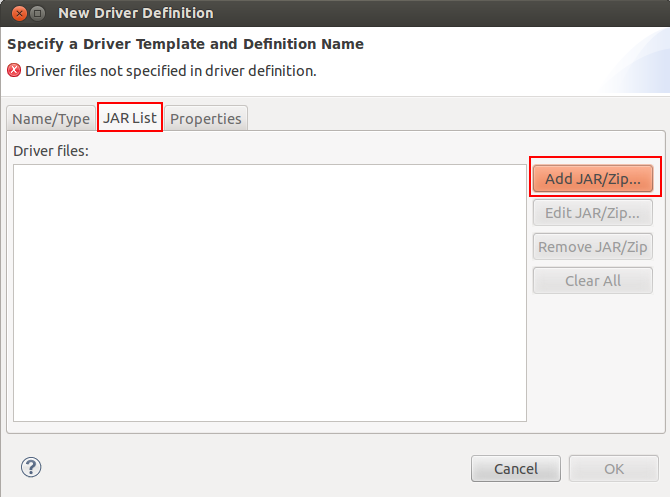
On Jar list tab click Add JAR/Zip ... and select downloaded MySQL JDBC driver from your file system (mysql-connector-java-5.1.23/mysql-connector-java-5.1.23-bin.jar):
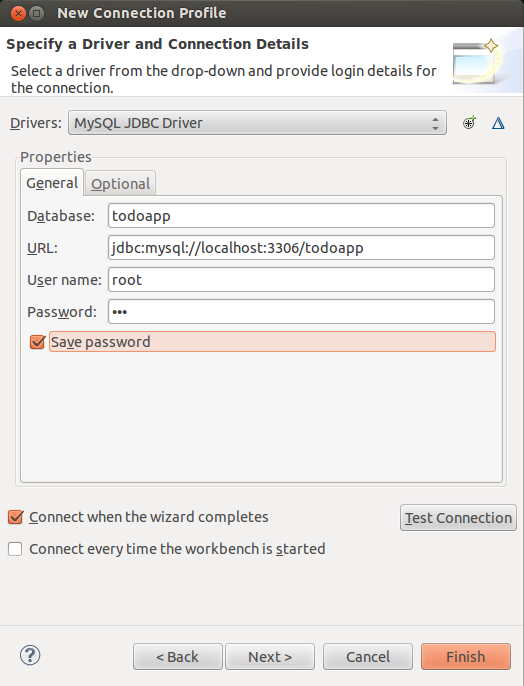
After you've selected the driver, click OK and define connection details as follows (password as defined earlier is 123):
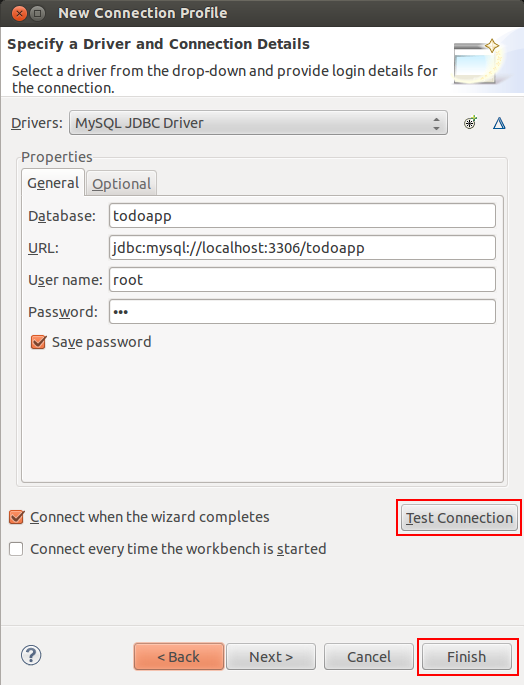
Click on Test Connection button to check if your connection was configured properly. If everything is OK, you should get a message box with a message: Ping succeeded !. Click Finish to complete new connection definition:
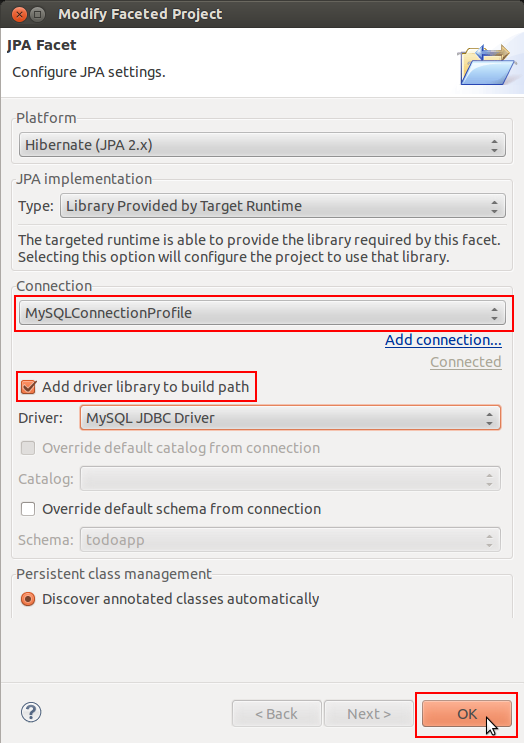
By default, the connection is set to MySQLConnectionProfile. Now there is only one thing to do. Check Add driver library to build path and click OK:
Configuring persistence settings (persistence.xml)
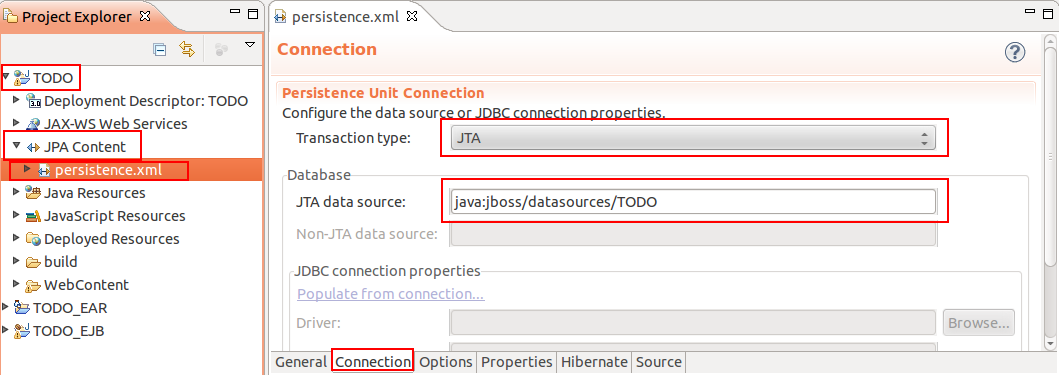
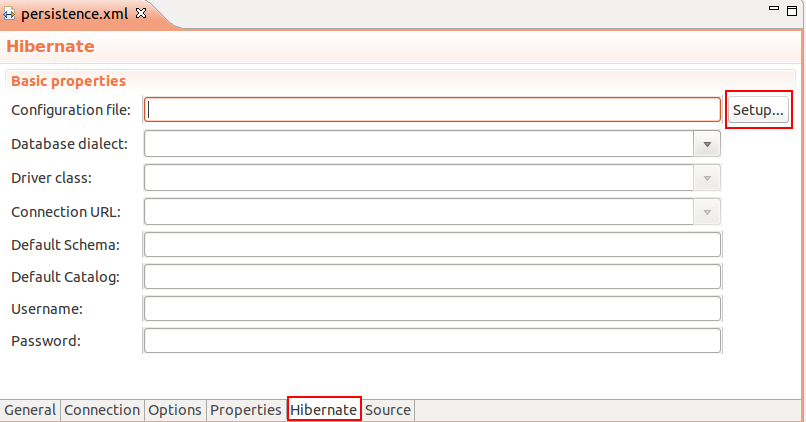
After configuring JPA 2.0 capabilities, you can now configure your database connection in persistance.xml. In your Eclipse project explorer go to TODO (Dynamic Web Project) -> JPA Content -> persistence.xml ->Connection tab and set Transaction Type to JTA and JTA Data Source to java:jboss/datasources/TODO:
Now go to Hibernate tab and click Setup button:
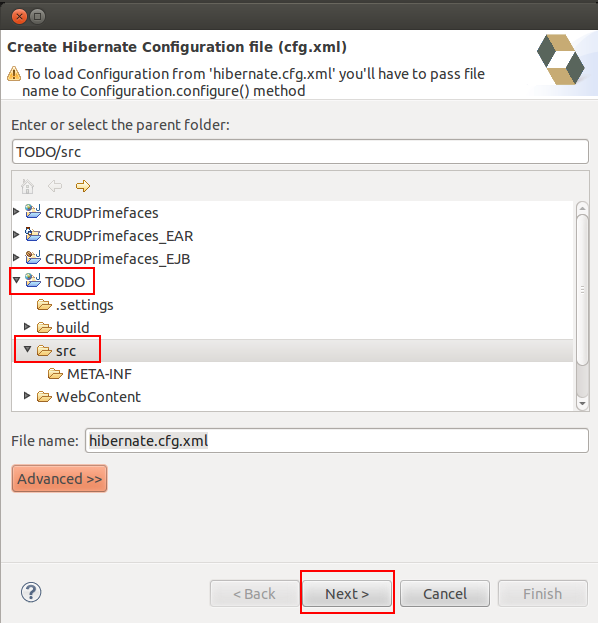
You will be asked if you want to create a new Hibernate configuration file or use the existing one. Click Create new ..., select TODO/src as destination folder for hibernate.cfg.xml and click Next>:
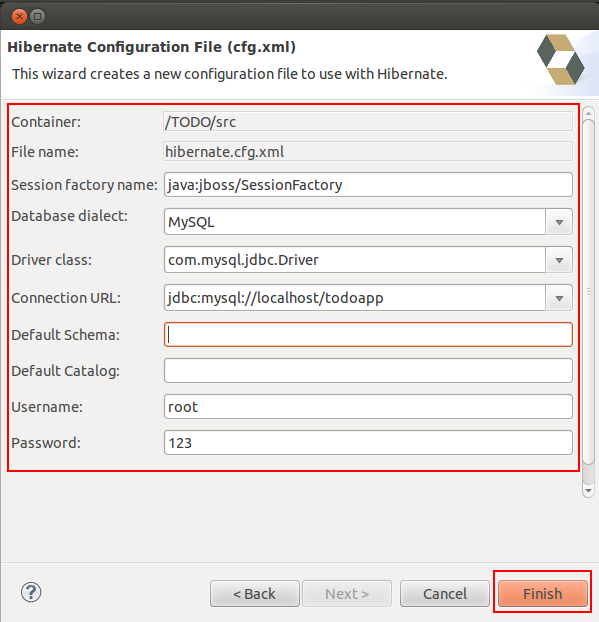
Set connection configuration and click Finish:
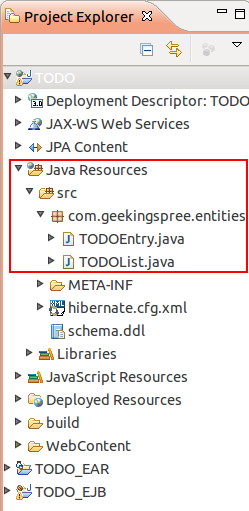
hibernate.cfg.xml file is created. You can go to Source tab and see what source was generated in persistence.xml:
Your hibernate.cfg.xml should have the following content:
Implementing Hibernate entities
Now, let's create Hibernate entities. I've created a package com.geekingspree.entities with two classes TODOEntry and TODOList:
Put the following code in TODOEntry.java:
Explanation:
- Let's start with line 13: @Entity annotation makes JPA entity from POJO class.
- In line 14: @Table annotation with name argument sets the name of the table in a database. This annotation is not required. By default table name in database is the same as class name.
- Line 17: each entity needs to have a primary key column. The field, which will be a primary key is annotated as @Id.
- Line 18: id field should be autoincremented so that we can annotate it with @GeneratedValue. We set the type of a generated value to IDENTITY, because we want the persistence provider to use the identity column to assign the primary key. You can also experiment with other strategies of generating values for a primary key. Here is a description of every strategy: GeneratedValue.
- For each attribute, which should be mapped to database column (except foreign key), should be annotated with @Column. @Column annotation has one parameter, which is name of the column in a database to which this field will be mapped.
- Line 37: @ManyToOne annotation. I intended a relation between TODOEntry and TODOList to be bidirectional, this means that we can get access to both objects from each other. Entity TODOEntry is an owner (is responsible for associated columns update). CascadeType.ALL means that I want all operations performed on an entity (persist, detach, merge, refresh, remove) to be propagated to an associated entity.
- Line 38: @JoinColumn annotation with name parameter. @JoinColumn sets name of a foreign key column name.
- Lines 41-95: accessors for all class attributes.
and the following code in TODOList.java:
Explanation:
This class is similar to TODOEntry. What should be explained is @OneToMany annotation in line 27. This annotation in this context gives us the possibility to create a bidirectional relation. For @OneToMany relation we need to specify an attribute of a class of TODOEntry, which is related to this field. Thanks to this solution we can grab all TODO tasks assigned to a particular list by using a TODOList object.
Synchronizing your Hibernate entities with database tables
Let's synchronize Hibernate entities with MySQL database. Right click on TODO (Dynamic Web Project) -> JPA Tools -> Generate Tables from Entities .... On Generate Tables from Entities page dialog check Export to Database and click Finish:

The following SQL command will be executed:
MySQL Driver setup as JBoss 7.1 AS
JBoss 7.1 AS automatically installs drivers which are JDBC Type 4 compliant. Since MySQL compliance is not full with JDBC Type 4, we need to install it as a module. Additionally, we need to modify jar file, which contains a MySQL driver. To do so, create somewhere on your computer a directory structure: META-INF/services and create java.sql.Driver file in services directory. java.sql.Driver file should contain the following content:
com.mysql.jdbc.Driver
Copy your mysql-connector-java-5.1.23-bin.jar file to directory in which you created META-INF, go to this directory and execute the following command:
Now we can use this modified driver as a JBoss module. To create a JBoss module go to JBoss root directory and create com/mysql/main directory structure (com directory is probably already there). Create module.xml file in com/mysql/main directory and put the following content in it:
you also need to copy modified mysql-connector-java-5.1.23-bin.jar file to this directory . Your JBoss is ready. Now we need to create JBoss datasource for java:jboss/datasources/TODO.
Datasource definition
By default JBoss 7.1 start with standalone server config. So that we need to add our datasource and driver definition to standalone.xml configuration file. Go to your JBoss root directory and edit standalone/configuration/standalone.xml file. Add the following node to datasources node:
Add the following driver node to drivers node (in datasources node):
EAR deployment on JBoss 7 AS
Now your application is ready to be deployed on JBoss 7.1 AS. You can deploy it to check if the whole configuration works fine. There is no user interface, so on the other hand, you won't see anything. In the next part of this tutorial I will explain how to integrate this Hibernate database layer with Primefaces and ManagedBeans.
Additional information
This article is a part of the series of articles called From Zero to PrimeFaces Hero on JBoss 7.1 with Hibernate, MySQL, Eclipse Indigo and JBoss Tools. If you’d like to get more information about this series, please check out this article. If you would like to refer to a previous article from this series, please see this article.
I've just realized that SyntaxHighlighter (I belive by Alex Gorbatchev) is not working on iOS (Safari). At least for mobile version of this site (this is blogger.com blog).
You won't see any source code on this page (like XML, java or other samples).
Sorry for technical problems. I will stop using this tool.
Best Regards,
Michael Flowersky
Unknown
August 1, 2013 at 11:12 PMI have stuck on generating tables from entities. I don't have tables on my database without any error. Can you guess the reason why? Could you please guide me to investigate the reason. One more thing is my connection is fine, I have tested and it's connected.
Unknown
May 31, 2014 at 10:28 PM